Baby Proofing Starter Kit: The Essential First Purchase for New Parents
The Essential First Purchase for New Parents

Most new parents buy a baby monitor first. Then a sound machine, a swaddle set, maybe a white-noise app. The cabinet locks sit in the cart, unpurchased, for another few weeks. That’s the gap where injuries happen.
Baby proofing feels like something you do gradually, room by room, once your baby starts moving. But the window between "not mobile yet" and "already into everything" is shorter than anyone warns you about. My younger daughter emptied the cabinet under the kitchen sink in the time it took me to answer the front door. She was 10 months old and had not yet taken a single independent step. Crawling is enough.
Why the First Purchase Matters More Than You Think
The hazards that injure babies most severely are not the ones that look dangerous. They’re the ordinary ones: stairs, cabinet doors, furniture edges, the bucket of cleaning solution under the sink. Per CDC PROTECT data, unsupervised medication exposures send roughly 100 children under five to U.S. emergency departments every day. Most of those medications were in a bathroom cabinet or a purse on the floor, not locked up.
Cabinet contents are only part of the picture. CPSC reports one child death every two weeks from furniture, TV, or appliance tip-overs. About 93,000 children under 5 are treated in U.S. emergency rooms each year for stair-related injuries, per a Nationwide Children’s analysis of CPSC NEISS data. These numbers describe ordinary homes with ordinary furniture and ordinary staircases.
The first purchase is not about buying everything at once. It’s about closing the highest-risk gaps before your baby reaches them.
The Core Kit: What Belongs in It
A starter kit should cover four categories: cabinet and drawer locks, stair gates, furniture anchors, and outlet covers. Everything else can wait. These four address the hazards most likely to cause a serious injury in the first year of mobility.
Cabinet and drawer locks are the category with the most variation in quality. Adhesive-mounted magnetic locks are the current standard for most cabinets. They’re invisible from outside, they hold reliably on flat-front doors, and they don’t require drilling. The tradeoff is surface compatibility: adhesive fails on textured, painted, or oily wood. I’ve installed six different magnetic lock systems across two homes, and one adhesive set failed on my older cabinets within three weeks. Always clean the surface with isopropyl alcohol before mounting, and check the bond at 48 hours before trusting it.
ASTM F3492–21 is the voluntary consumer safety standard that applies to cabinet locks and latches in the U.S. It’s worth knowing that standard exists, but also knowing it’s voluntary. A 2012 CPSC recall pulled 900,000 Safety 1st Push 'N Snap cabinet locks after reports of children as young as 9 months opening them. Three of those children reached toxic cleaning products. The recall is a reminder that brand recognition is not the same as quality. Check CPSC’s recall database before you buy.
One more thing about packaging: many of the products parents store in cabinets are required by 16 CFR 1700.14 to ship in child-resistant packaging. But federally child-resistant packaging only has to keep 80–85% of test-panel children (ages 42–51 months) out. The packaging is a backup, not a barrier. The lock is the barrier.
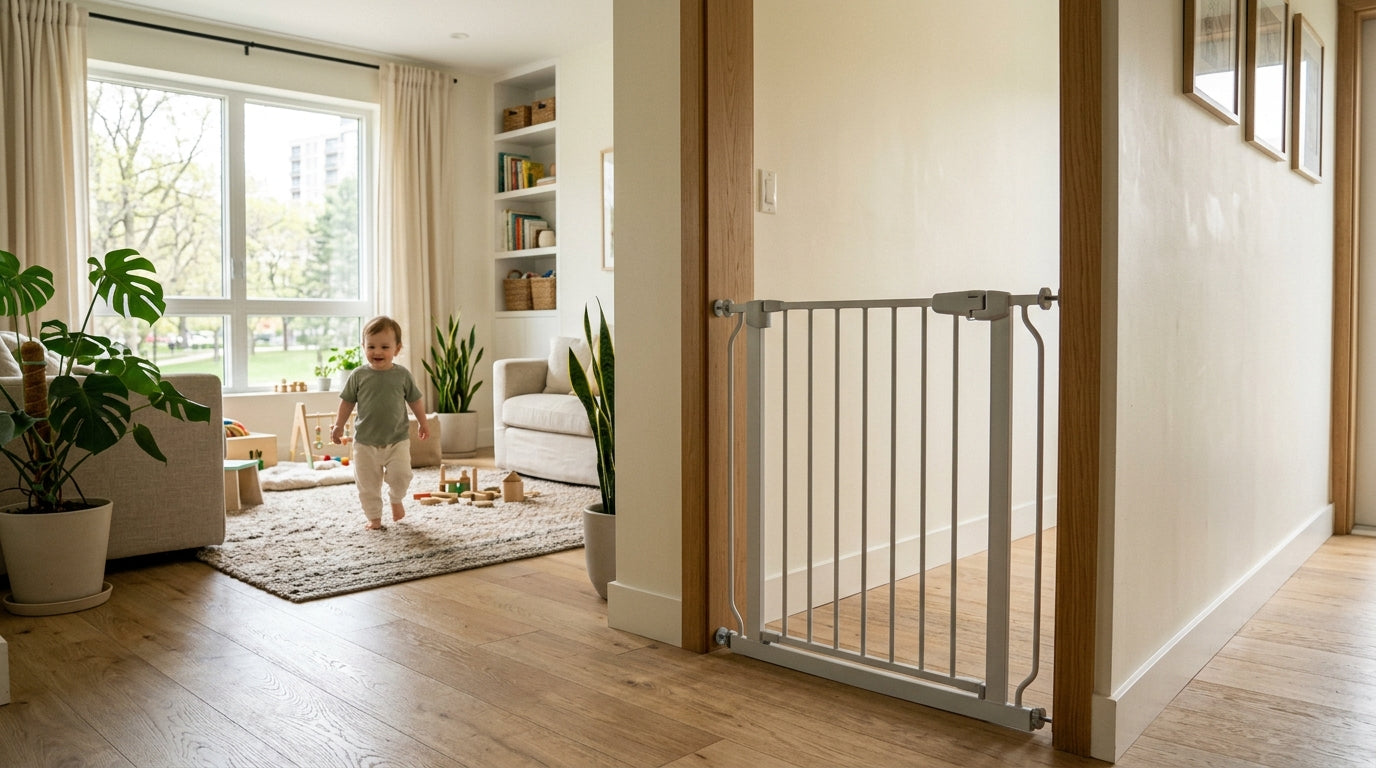
Stair gates are non-negotiable if your home has stairs, and they need to be hardware-mounted at the top. Pressure-mounted gates are fine at the bottom of stairs as a deterrent, but at the top, a pressure gate can be pushed out by a falling child’s weight. ASTM F1004 is the federal safety standard for expansion gates and expandable enclosures, made mandatory under 16 CFR Part 1239 (effective 2021). Look for that certification on the packaging. Hardware-mounted gates require drilling into the wall or banister, which most parents resist until they’ve watched a toddler test a pressure gate.
Furniture anchors address tip-over risk for dressers, bookshelves, and TVs. The anchor kits themselves are inexpensive. The installation takes 20 minutes. A CPSC tip-over death involves a child every two weeks in the U.S., and most of those involve furniture that was not anchored. Dressers are the most common culprit because children use the open drawers as a ladder. Anchor the dresser first, then the bookshelf, then anything else that could fall.
Outlet covers are the most visible baby-proofing product and probably the least dangerous hazard on this list, but they’re cheap and fast to install. Sliding plate covers are better than plug-in caps: they can’t be removed and swallowed, and they work with furniture pushed against the wall.

- Unlocked cabinet with cleaning products inside
- Unanchored tall dresser or bookshelf
- Accessible outlet at floor level
- Staircase without hardware-mounted gate
What to Skip in the First Round
Baby proofing product marketing will push you toward corner guards, door pinch guards, toilet locks, and appliance latches. Some of these matter. None of them matter as much as the four categories above, and buying all of them at once leads to installation fatigue and half-finished jobs.
Corner guards are worth adding once you have a walking baby who falls frequently. Door pinch guards are useful when you have an older sibling who slams doors. Toilet locks matter once your baby is pulling to stand. According to the AAP, a child can drown in as little as one to two inches of water, which means standing water anywhere in the home is a hazard. But that risk escalates with mobility, and you have time to add those layers.
Buy the core four first. Install them completely. Then reassess.


How to Evaluate a Specific Product
Three things to check before you buy:
Certification. Does the product meet the relevant ASTM or federal standard? For gates, look for ASTM F1004 compliance. For cabinet locks, check whether the product references ASTM F3492–21. If a product makes no mention of any safety standard, that’s a signal.
Recall history. Search the product name on CPSC’s recall database at cpsc.gov. This takes two minutes and has saved me from buying two products I would otherwise have trusted.
Mounting method vs. your surfaces. Adhesive locks fail on certain surfaces. Hardware-mounted gates require specific wall materials. Measure your stair opening before ordering a gate. Check your cabinet surface before ordering adhesive locks. The right product for someone else’s kitchen may not work in yours.
-
Check certification
Confirm the product references ASTM F1004 (gates) or ASTM F3492–21 (cabinet locks). No standard listed is a red flag. -
Search the CPSC recall database
Visit cpsc.gov and search the product name. Takes two minutes and can rule out products with known failure histories. -
Match mounting method to your surfaces
Measure stair openings before ordering gates. Test cabinet surfaces before committing to adhesive locks. -
Check the adhesive bond at 48 hours
After installing adhesive-mounted locks, verify the bond holds before trusting it with unsupervised access.
Installing Before Baby Arrives
The best time to install a starter kit is before your baby is mobile. That sounds obvious, but most parents wait until they see the behavior they’re trying to prevent. By then, the window has closed.
My older daughter defeated an adhesive strap lock at 26 months. I had installed it at 18 months, felt confident, and didn’t check the adhesive bond again for eight months. The lesson wasn’t that the product failed. It was that installation is not a one-time event. Check anchors and adhesive bonds every few months. Hardware-mounted gates should be tested for wobble. Magnetic locks should be verified to engage fully.
Baby proofing is maintenance, not a project you complete.
Starter Kit Install Checklist
A Note on Smoke and CO Detectors
These belong in any honest starter kit conversation, even though they’re not traditional "baby proofing" products. Per the NFPA, three out of five home fire deaths occur in homes with no smoke alarms or non-functioning ones. Per the CDC, CO poisoning kills more than 400 people each year and sends more than 100,000 to U.S. emergency rooms. If you’re buying safety products for a new baby, check your smoke and CO detectors at the same time. Replace any that are more than 10 years old. Add a CO detector if you don’t have one on each floor.
Where to Start Today
If you buy nothing else this week, buy these four things: a magnetic cabinet lock kit, a hardware-mounted stair gate sized to your opening, a furniture anchor kit for your tallest dresser, and sliding outlet covers for every accessible outlet. Install them in that order. Check the adhesive bonds at 48 hours and again at 30 days.
Everything else in the baby-proofing category is real, and most of it is worth doing. But this is the kit that closes the gaps most likely to matter before your baby’s first birthday.